
Showing posts with label Favorite. Show all posts
Showing posts with label Favorite. Show all posts
Monday, September 16, 2013
Coconut Shrimp
1 lb (24) large raw shrimp, peeled and deviened (weight after peeled)
1/2 cup + 1 tbsp shredded sweetened coconut
1/2 cup + 1 tbsp panko crumbs
2 tbsp all purpose flour (you will only use 1 tbsp)
1 large egg
pinch salt
non-stick spray
For the Sweet and Spicy Dipping Sauce:
1/2 cup apricot preserves (you can use sugar free if you wish)
1 tbsp rice wine vinegar
3/4 tsp crushed red pepper flakes
Preheat oven to 425°. Spray a non-stick baking sheet with cooking spray.
Combine coconut flakes, panko crumbs and salt in a bowl. Place the flour on a small dish. Whisk egg in another bowl.
Lightly season shrimp with salt. Dip the shrimp in the flour, shaking off excess, then into the egg, then in the coconut crumb mixture.
Lay shrimp on the cookie sheet then spray the top of the shrimp with more cooking spray; bake in the middle rack for about 10 minutes. Turn shrimp over then cook another 6-7 minutes or until cooked though. Remove from oven and serve with dipping sauce.
For the sauce, combine all the ingredients and place in a small bowl.
To freeze: If shrimp was fresh, freeze the shrimp before cooking on a wax paper or silpat lined cookie sheet. Once frozen, place in freezer bag. If shrimp is frozen, you could try coating them while frozen, or just mix up the coating and bag and freeze that to coat the shrimp just before cooking for dinner.
To Serve: Cook as above. Thaw shrimp laid out on cookie sheet, or add a little extra cook time.
I originally found this recipe on skinnytaste.
Skillet Lasagna
8 oz ground meat
(sausage, turkey, beef, pork)
1 med onion, chopped
2 cups spaghetti sauce
1 cup water
2 cups dried wide
noodles (I break them up a bit)
1 1/2 cups coursely
chopped zucchini
1/2 cup ricotta cheese
2 tablespoon grated
parmesan or Ramano cheese
1 tablespoon fresh
parsley
1/2 cup mozzarella
cheese
In a large skillet cook
sausage and onion until meat is brown and onion is tender, breaking up meat
while cooking. Drain off fat. Stir is spaghetti Sauce and the water. Bring to
boiling. Stir in noodles and zucchini. Return to boil, reduce heat. Simmer, covered,
about 12 min or until noodles are tender, stirring occasionally.
Meanwhile, in a small
bowl stir together ricotta, Parmesan, and parsley. Drop cheese by spoonful into
6 mounds over the sausage-noodle mixture in skillet. Sprinkle each mound with
mozzarella. Cover and cook on low heat for 4-5 min until cheese mixture is
heated through. Let stand for 10 min before serving.
To lighten: Use reduced fat ricotta and mozzarella cheese. Use ground turkey
To lighten: Use reduced fat ricotta and mozzarella cheese. Use ground turkey
Grilled Herb Chicken
2 T chopped oregano
1 T chopped Thyme
1 T chopped rosemary
2 t olive oil
½ t salt
4 boneless, skinless
chicken breasts
(If you don’t have fresh
herb: 1 T fresh herbs = 1 t dried herbs)
Combine the herbs, oil,
and salt. Rub mixture on both sides of chicken. Heat a
pan or grill to medium-high heat. Add the chicken and cook until
browned and cooked through, about 4 minutes on each side.
Quinoa & Cilantro Salad with Lemon & Garlic
1 cup of dry Quinoa
½ tsp of sea salt
1 cups water
½ bunch of cilantro
½ cup corn, chopped
½ cup parsley, minced
Dressing
Ingredients
2-3 cloves garlic, minced
¼ cup freshly squeezed lemon juice
2 tablespoons extra-virgin olive oil
1 Tsp sea salt or to taste
Rinse quinoa well with warm water and drain. (Quinoa has a natural
coating of saponin, the bitter taste of which repels insects and birds. Rinsing
with warm water removes the saponin.)
Add salt to water in a pot. Bring to a
boil, add quinoa, reduce heat to low, cover, and let simmer 15-20 minutes,
until all the water is absorbed. Fluff into large salad bowl and allow to cool.
Prepare vegetables and dressing.
Combine garlic, lemon juice, oil, and sea salt, pour over quinoa and
toss well. Wash and spin-dry cilantro leaves and chop into bite-size pieces or
thin strips. Add cilantro, corn and parsley to quinoa. Toss Gently. Serve
at room temperature or chilled.
Cilantro Lime Tacos
cooking spray for sauteeing 2-3 large boneless, skinless chicken breasts, cut in bite sized pieces
salt and pepper to taste
1 teaspoon garlic powder
1/2 cup cilantro lime pesto (recipe follows)
flour or corn tortillas (we use whole wheat flour tortillas)
preferred taco garnishes (I recommend seasoned black beans, cheese, Romaine Lettuce and black olives)
Season chicken with salt, pepper and garlic powder. In a skillet sprayed with cooking spray, saute chicken over medium high heat and cooked through. Toss cooked, seasoned chicken with the pesto. If you like more of a biting garlic taste do not heat the pesto. If you prefer a milder garlic taste heat the chicken with the pesto on it for a little it.Fill tortillas with chicken and top with preferred garnishes.
To freeze: Cook chicken as directed as above and cool. Place chicken in freezer bag. Prepare cilantro lime pesto as directed below. Place a 1/2 cup of pesto in a small storage bag then place inside the freezer bag with the chicken. Freeze. When ready to prepare, defrost and heat chicken. Toss chicken with defrosted pesto. If desired, heat chicken and pesto together before filling tacos.
Cilantro Lime Pesto (makes enough for at least 2 batches)
1 cup fresh cilantro leaves (do not include stems unless you have a high power blender like a Vitamix or a Blentec and place cilantro in the blender leaves down)
2 1/2 tablespoons extra virgin olive oil
2 tablespoons sliced, toasted almonds (we omit due to allergies)
3 tablespoons chopped, fresh garlic (or more to taste)
1 1/2 teaspoon lime juice
1/2 cup shredded Parmesan
add salt if needed
1/4 cup chicken broth
Using a blender, mix together the cilantro, olive oil, almonds, garlic, lime juice, Parmesan, salt and chicken broth on low speed for 2 minutes.
I originally found this recipe on pinterest and it linked to here.
Whole Chicken with Lemon and Rosemary in the Crockpot
Whole Chicken (I like to take the skin off)
head of garlic
2 lemons
salt and pepper
a bunch of fresh rosemary
After you skin the chicken rub it inside and out with a bunch of salt and pepper. Place it in the crockpot. Peel your garlic and shove a bunch of the whole cloves into the bird cavity and throw some more on top and around the chicken. Slice the lemon and put slices on top, around, and inside the bird. Wash the rosemary and do the same. If you are using dried rosemary, use a good amount---probably 2-3T of dried herbs.
After you skin the chicken rub it inside and out with a bunch of salt and pepper. Place it in the crockpot. Peel your garlic and shove a bunch of the whole cloves into the bird cavity and throw some more on top and around the chicken. Slice the lemon and put slices on top, around, and inside the bird. Wash the rosemary and do the same. If you are using dried rosemary, use a good amount---probably 2-3T of dried herbs.
Do not add water. Cook on low for 8-10 hours, Or high for 5-6 hrs
White Bean Chili
2-3 C shredded chicken
2 cans white beans, w/ juices
1 can black beans, drained
1 can chicken broth
1 can cream of chicken soup
1 t cumin
½ t garlic powder
1 diced onion
2 smalls cans green chilies
16 oz sour cream
Stir together
everything but the sour cream (reserve it in the fridge.) Bag it up and freeze.
To serve: Thaw, heat-up, when bubbly add sour cream. When
bubbly again, it's ready.
Upside-down Fettuccine bake
½ lb Italian sausage
¼ C chopped onion
8 oz fettuccine
1 14½-oz can diced tomatoes
1 t dried oregano
½ C shredded
mozzarella cheese
½ C grate Parmesan cheese
3 slightly beaten eggs
2 T melted butter
2 T parsley flakes
½ t chopped garlic
Brown sausage. Add
onion during last few minutes. Drain fat. Meanwhile cook
the fettuccine Add tomatoes and their liquid to sausage
mixture. Add oregano and bring to a boil. Reduce the heat
and simmer, covered, about 20 min, stirring occasionally. Stir in
mozzarella and half of the Parmesan cheese.
Mix the eggs, the rest of the Parmesan cheese, butter, parsley,
and garlic together in medium bowl. Toss the noodles with the egg
mixture. Spread the noodles in 10-in round pan. Pour the
sausage mixture on top. Cover with foil, label and freeze.
To serve, thaw and bake, uncovered, in preheated 350˚ oven
about 25 min, or until bubbly. Cut and serve.
To Lighten: Use Turkey Sausage, Use 1/3 C part skim mozzarella, 1/3 C Parmesan Cheese, reduce eggs to 2, and reduce butter to 1 T.
To Lighten: Use Turkey Sausage, Use 1/3 C part skim mozzarella, 1/3 C Parmesan Cheese, reduce eggs to 2, and reduce butter to 1 T.
Orange tarragon Glazed Chicken
½ C chopped onion
6 boneless,
skinless chicken breasts
1 12-oz frozen
orange juice concentrate, thawed slightly
1 T tarragon
1 t salt
In a skillet sauté
onions. Put all ingredients into labeled 1-gallon freezer bag and
freeze.
To serve, thaw and pour into treated 9x13 baking dish. Bake
at 375˚ for 50 min. Or grill the chicken (medium heated
grilled) for 20 min, turning once.
Adobe Chicken
4 boneless,
skinless chicken breasts
2 T olive oil
½ t salt
½ t pepper
1 15-oz can black
beans, drained and rinsed
1 11-oz bag frozen corn
1 2¼-oz can sliced
olives, drained
1 t garlic powder
1 t cumin
1 C sour cream
1 C salsa
2 C shredded Pepper-Jack Cheese
Cut chicken breast
into ½-inch strips. Cook chicken strips in skillet in olive oil, turning
frequently. Season the chicken strips with salt and pepper as they
cook. Meanwhile, in large bowl, mix all the remaining ingredients except
the cheese. Mix in cooked chicken. Pour the chicken strip mixture
into a 1-gallon freezer bag. Attach cheese in a separate bag.
To serve, thaw. Place chicken strip mixture in a deep
skillet. Bring to a boil, reduce heat, and simmer 10 min. Sprinkle
cheese over chicken to serve.
To lighten, use broth to cook chicken. Use fat-free
sour cream, or strained fat-free plain yogurt. Reduce the amount of
cheese, or use reduced fat cheese. If reducing cheese you may want to
add some reduced fat cream cheese, but not necessary.
Wednesday, May 4, 2011
Super-Duper Caramel Corn
2 bags of microwave Kettle Corn (about 16 C)
1/2 C butter
1 1/3 C sugar
1/2 C light corn syrup
2 t vanilla
1 C whole almonds
1 C pecan halves1 C milk chocolate chips
1 C white chocolate chips
Pop your popcorn. Then, in a saucepan mix the butter, sugar, corn syrup, & vanilla. Cook on medium to medium-high heat until the mixture reaches 228-232 F on your candy thermometer. In a BIG bowl, mix together the popcorn, candy mixture, & nuts. Be careful, it’s hot!. Then, spread it out over a greased cookie sheet to let it harden. Finally, top it all off with a generous drizzling of milk & white chocolate.
Friday, April 8, 2011
Spaghetti Sauce
1 C chopped onion
1 lb sausage
1 6 oz can tomato paste
1 28 oz can crushed tomatoes in puree. (I often use diced)
1/2 C water
1 C tomato sauce
2 t chopped garlic
2 bay leaves
1 T sugar
2 t dried basil
1 tn dried oregano
2 T fresh parsley (I usually don't have this so I use 2 teaspoons dried)
1 t salt
Brown onions and meat. Add the rest of the ingredients and bring to a boil. Reduce heat and let simmer 30 min, partially covered.
Thursday, February 17, 2011
Garlic Cheese Dip
1 loaf sheepherders bread
¼ lb. butter
1 bunch green onions, chopped
12 cloves of garlic, minced finely
1 pkg. (8 oz) cream cheese, room temperature
16 oz. sour cream
12 oz. Cheddar cheese, grated
1 can (10 oz.) artichoke hearts, drained and cut into quarters (water pack not marinated)
Cut a hole in the top of the bread loaf about 5 inches in diameter. If you wish, make a zigzag pattern to be decorative. Remove soft bread from cut portion and discard. Reserve crust to make top for loaf. Scoop out most of the soft inside portion of the loaf and save for other purposes, such as stuffing or dried breadcrumbs.
In about 2 tablespoons butter, sauté green onions and half the garlic until onions wilt. Do not burn! Cut cream cheese into small chunks; add onions, garlic, sour cream and Cheddar cheese. Mix well. Fold in artichoke hearts.
Put all of this mixture into hollowed out bread. Place top on bread and wrap in a double thickness of heavy-duty aluminum foil. Bake in 350-degree oven for 11/2 to 2 hours. Slice French rolls thinly and butter with remaining butter and garlic. Wrap in foil and bake with big loaf for the last 30 minutes. When ready, remove foil and serve, using slices of French rolls to dip out sauce.
To lighten, use fat-free sour cream, reduced-fat cream cheese, and decrease butter by up to half.
Friday, May 14, 2010
Staked Green Chile & Grilled Chicken Enchilada
Our hosts this month, Barbara of Barbara Bakes and Bunnee of Anna+Foodhave chosen a delicious Stacked Green Chile & Grilled Chicken Enchilada recipe in celebration of Cinco de Mayo! The recipe, featuring a homemade enchilada sauce was found on www.finecooking.com and written by Robb Walsh.
This challenge was such a exciting one for me. I have been trying to master enchiladas for about a month when this was presented. Several times I was able to make an inedible mess, but nothing I would want to actually eat. One night we sat down to dinner and I thought I had finally done it... but I was wrong. I took one bite and announced we were going out to eat. No one else had even picked-up their forks yet!
SO I made my own tortillas and enchilada sauce. SOOOO good. I have been munching on enchiladas for lunch now several times a week. Here is the best part even Chris liked them... and he doesn't like enchiladas. He doesn't even much like Mexican food!
I LOVED making my own enchilada sauce. While I was at it I made some hot sauce for Chris' boss too!
I made these for Mother's Day. While I was cooking I called my Mom's best friend, My Auntie Kathy. She gave me all her tips and tricks from her mom for enchiladas. Thanks Kathy for chatting with me on Mother's Day!
The recipe:
Ingredients
1½ pounds Fresh Anaheim chilies (about eight 6 to 8 inch chilies) 24 ounces 678 grams - roast, peel, remove seeds, chop coarsely. Other green chilies (NOT bell peppers) could probably be substituted but be conscious of heat and size!)
7-8 ounces Tomatillos (about 4-5 medium)212 grams - peel, remove stems
4 cups Chicken broth (32 ounces/920 grams)
1 clove Garlic, minced
2 teaspoons yellow onion, minced
1 teaspoon dried oregano
½ tsp Kosher salt (add more to taste)
¼ tsp Black Pepper (add more to taste)
2 tablespoons Cornstarch (dissolve in 2 tablespoons water, for thickening)
Hot sauce, your favorite, optional
2 Boneless chicken breasts (you can also use bone-in chicken breasts or thighs)
3 tablespoons Olive oil or other neutral vegetable oil (use more as needed)
Kosher salt and pepper
12 Small Corn tortillas (5-6 inch/13-15 cm). (you can also use wheat tortillas or other wraps)
6 ounces grated Monterey Jack, 170 grams (other cheeses (cheddar, pepper jack, Mexican cheeses) can be used. Just be sure they melt well and complement the filling)
Cilantro for garnish, chopped and sprinkled optional
Directions:
Roasting Fresh Chilies
1. Coat each chili with a little vegetable oil. If you are doing only a couple chilies, using the gas stove works. For larger batches (as in this recipe), grilling or broiling is faster.
2. Lay the oiled chilies on the grill or baking sheet (line pan with foil for simpler clean-up). Place the grill or broil close to the element, turning the chilies so they char evenly. They should be black and blistered.
3. As they are completely charred (they will probably not all be done at once), remove them to a bowl and cover with plastic, or close up in a paper bag. Let them rest until they are cool.
4. Pull on the stem and the seed core MAY pop out (it rarely does for me). Open the chili and remove the seeds. Turn the chile skin side up and with a paring knife, scrape away the skin. Sometimes it just pulls right off, sometimes you really have to scrape it.
5. DO NOT RINSE!
Green Chili Sauce
1. Put a medium saucepan of water on to boil and remove the papery outer skin from the tomatillos. Boil the tomatillos until soft, 5 to 10 minutes. You can also grill the tomatillos until soft.
2. Drain and puree in a blender or food processor.
3. Return the tomatillos to the saucepan along with the chicken broth, chopped green chilies, minced onion, oregano, garlic, salt and pepper.
4. Bring to a boil over medium-high heat and then reduce the heat and simmer for 10 minutes.
5. Add the cornstarch/water mixture and stir well. Simmer, stirring occasionally, until the sauce is thickened and reduced to 4-5 cups, another 10-15 minutes.
6. Adjust seasonings and add hot sauce if you want a little more heat.
Stacked Green Chile and Grilled Chicken Enchiladas
1. Heat a gas grill to medium high or build a medium-hot charcoal Coat the chicken with olive oil and season well with salt and pepper. Preheat oven to 450 degrees.
2. Grill the chicken until just cooked through, 4-5 minutes a side for boneless chicken breasts.
3. Cool and then slice into thin strips or shred.
4. In a small skillet, heat 3 tablespoons oil over medium-high heat until very hot. Dip the edge of a tortilla into the oil to check – it should sizzle immediately.
5. Using tongs, put a tortilla into the pan and cook until soft and lightly brown on each side, about 15-20 seconds per side (at the most).
6. Drain on paper towels.
7. Add oil as needed and continue until all 12 tortillas are done.
8. In a baking dish large enough to hold four separate stacks of tortillas, ladle a thin layer of sauce.
9. Lay four tortillas in the dish and ladle another ½ cup (4 ounces/112 grams) of sauce over the tortillas.
10. Divide half the chicken among the first layer of tortillas, top with another ½ cup of sauce and 1/3 of the grated cheese.
11. Stack another four tortillas, top with the rest of the chicken, more sauce and another third of the cheese.
12. Finish with the third tortilla, topped with the remaining sauce and cheese.
13. Bake until the sauce has thickened and the cheese melted, about 20 minutes. Let rest for 5-10 minutes.
14. To serve, transfer each stack to a plate. Spoon any leftover sauce over the stacks and sprinkle with cilantro, if you wish. The stacks may also be cooked in individual gratin dishes.
Additional Information:
Roasting chilies: Whether you roast the chilies on a grill, under the broiler, or use the gas burner element on your stove will affect the time it takes. If you do all the chilies at once on a grill or using the broiler, it will take 15- 30 minutes, plus time to steam (10 minutes) and time to peel and remove seeds (20 minutes).
Cooking tomatillos: If you boil the tomatillos, it will take 5 -10 minutes. If you grill them, it will take 2-5 minutes. If you broil them, it will take 8-12 minutes. This can be done the same time the chilies are roasting. After they are cooked, they need to be pureed, which takes a few seconds in a blender.
Cooking chicken: If you grill your chicken, it takes about 5 or 6 minutes per side for boneless chicken breasts- depending on thickness of breasts. Other pieces (thighs, for example) or bone-in chicken will take longer. If you roast your chicken, a bone-in breast takes about 30 minutes (depending on size). Be sure chicken is done but not overcooked, since it will be in the oven in the last stage of the recipe.http://kalynskitchen.blogspot.com/2007/05/how-to-make-juicy-grilled-chicken.html
Corn Tortillas (from Rick Bayless’s Mexican Kitchen)
Makes about 15
1 3/4 cups masa harina
1 cup plus 2 tablespoons hot water
Pour hot water over masa harina, cover and let sit 30 minutes. Add (additional) cool water 1 tablespoon at a time until the dough is soft but not sticky. Divide the dough into 15 balls and cover with plastic wrap.
Heat a large (two burner) ungreased griddle or two large skillets, one on medium-low and one on medium-high.
Put a ball of dough between two sheets of plastic. If you don’t have a tortilla press, press to a 5-6” circle using a heavy frying pan or bread board or other heavy, flat object. Put the tortilla into the cooler pan or cooler end of the griddle. The tortilla will probably stick, but within 15 seconds, if the temperature is correct, it will release. Flip it at that point onto the hotter skillet/griddle section. In 30-45 seconds, it should be dotted with brown underneath. Flip it over, still on the hot surface and brown another 30 seconds or so. A good tortilla will balloon up at this point. Remove from heat and let them rest while cooking the remaining tortillas. Use quickly.
Saturday, March 13, 2010
Risotto
I was very excited to make Risotto this month. I have been wanting to make risotto for quite some time. Probably in part because of Gordon Ramsey and Hell's Kitchen. It sure seems like all the cooks on there struggle so much. I wanted to see what all the fuss was about.
I started by making the stock. I guess that is a bit obvious, since you need it for the risotto. The stock was alright. I didn't dig on the cinnamon. I thought the stock was better the older it got. I actually made risotto twice this month. The second time was so much better than the first time, but the first time was pretty dang good.
The Recipe as I received it:
Chicken Stock
Ingredients:
1 large chicken 2-3 pounds about 1 kg
chicken bones 2-3 pounds 1 kg
2 onions, roughly diced
1 medium leek - white part only, roughly diced
2 sticks celery, roughly diced
2 cloves garlic, halved
1 cinnamon stick
1 tsp. white peppercorns ( Any type of whole peppercorn will do)
2 bay leaves (fresh or dried, it doesn't matter.)
peel of 1/2 lemon
1/4 tsp. allspice
Directions:
1.Wash the chicken and bones and places in a 5 Litre pot, cover completely with water and bring to a boil
2.Skim away any scum as it comes to the surface
3.Add the vegetables and bring back to a boil
4.Add the rest remaining ingredients and simmer very gently, uncovered for 1.5 hours
5.Carefully lift out the chicken, set aside. The chicken meat can be removed from the chicken, shredded off and used for other things like soup!
6.Simmer the stock gently for another hour. At , at the end you should have around 2 Liters
7.Carefully ladle the liquid into a fine sieve, the less the bones and vegetables are disturbed in this process the clearer the stock will be. The stock is now ready for use. Freeze what you don't need for later use.
Risotto Base
Ingredients:
olive oil 2 fluid oz 60 ml
1 small onion, quartered
rice 14 oz 400g
Any type of risotto rice will do. I use Arborio but the recipe itself says Vialone Nano. Another to look for is Carnaroli.
white wine 2 fl oz 60 ml
chicken or vegetable stock , simmering 2 pints 1 L
Directions:
1.Heat oil in a pan and add onion. Fry for a few minutes to flavour the oil then discard. (We diced ours and left it in as we like onion).
2.Add the rice and stir for a few minutes to coat each grain of rice with oil and toast slightly.
3.Add the wine and let it bubble away until evaporated.
4.Add enough stock to cover the rice by a finger’s width (about an inch or two). Don't actually stick your finger in, it will be hot. Just eye it off.
5.Cook on medium heat, stirring with a wooden spoon from time to time, until most of the stock has been absorbed.
6.Repeat Step 5 making sure to leave aside approximately 100 ml. of stock for the final step. .
7.Repeat, save 100ml for the final stage.
8.Once you are at this point, the base is made. You now get to add your own variation.
I started by making the stock. I guess that is a bit obvious, since you need it for the risotto. The stock was alright. I didn't dig on the cinnamon. I thought the stock was better the older it got. I actually made risotto twice this month. The second time was so much better than the first time, but the first time was pretty dang good.
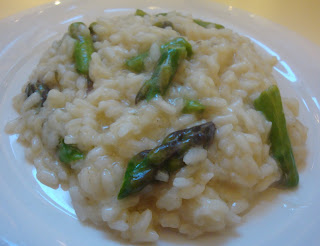
I decided to make asparagus risotto. I can't say enough about how yummy this really was. The only thing I had to change was salt. There is no salt in the recipe. So the second time around I added salt to the stock. So much better having the salt cooked into the rice then adding the salt on top after it is done.

Chicken Stock
Ingredients:
1 large chicken 2-3 pounds about 1 kg
chicken bones 2-3 pounds 1 kg
2 onions, roughly diced
1 medium leek - white part only, roughly diced
2 sticks celery, roughly diced
2 cloves garlic, halved
1 cinnamon stick
1 tsp. white peppercorns ( Any type of whole peppercorn will do)
2 bay leaves (fresh or dried, it doesn't matter.)
peel of 1/2 lemon
1/4 tsp. allspice
Directions:
1.Wash the chicken and bones and places in a 5 Litre pot, cover completely with water and bring to a boil
2.Skim away any scum as it comes to the surface
3.Add the vegetables and bring back to a boil
4.Add the rest remaining ingredients and simmer very gently, uncovered for 1.5 hours
5.Carefully lift out the chicken, set aside. The chicken meat can be removed from the chicken, shredded off and used for other things like soup!
6.Simmer the stock gently for another hour. At , at the end you should have around 2 Liters
7.Carefully ladle the liquid into a fine sieve, the less the bones and vegetables are disturbed in this process the clearer the stock will be. The stock is now ready for use. Freeze what you don't need for later use.
Risotto Base
Ingredients:
olive oil 2 fluid oz 60 ml
1 small onion, quartered
rice 14 oz 400g
Any type of risotto rice will do. I use Arborio but the recipe itself says Vialone Nano. Another to look for is Carnaroli.
white wine 2 fl oz 60 ml
chicken or vegetable stock , simmering 2 pints 1 L
Directions:
1.Heat oil in a pan and add onion. Fry for a few minutes to flavour the oil then discard. (We diced ours and left it in as we like onion).
2.Add the rice and stir for a few minutes to coat each grain of rice with oil and toast slightly.
3.Add the wine and let it bubble away until evaporated.
4.Add enough stock to cover the rice by a finger’s width (about an inch or two). Don't actually stick your finger in, it will be hot. Just eye it off.
5.Cook on medium heat, stirring with a wooden spoon from time to time, until most of the stock has been absorbed.
6.Repeat Step 5 making sure to leave aside approximately 100 ml. of stock for the final step. .
7.Repeat, save 100ml for the final stage.
8.Once you are at this point, the base is made. You now get to add your own variation.
Wednesday, July 1, 2009
Teething Biscuits!

I have been meaning to post this for awhile. But it just hasn't happened.
Some time ago my sister in-law sent me a recipe for . (Thanks Sheila!)
They are GREAT! They are nice and hard so they last and do break apart all over the place!
1 1/2 c unbleached flour
1/2 c whole wheat flour
1/2 c maple syrup
3 tbsp applesauce
Heat oven to 300. Place all ingredients in a medium bowl and stir with a wooden spoon until dough begins to hold together. Dust counter with flour, then transfer contents of bowl to counter. Knead lightly until the dough is smooth, about 3 minutes. (If the dough is difficult to handle, dust with a little more flour) Roll out with a rolling pin until 1/3 inch thick. Cut out biscuits using an inverted cup and a clean bottle cap, milk lid, or your thumb for the hole. Transfer biscuits to a greased cookie sheet. Bake until barely browned, about 35 minutes. let cool completely on cookie sheet. They are ready to eat now or they will harden slightly more if you leave them out overnight. Store for up to two weeks in an airtight container.
I did not cut them into circles. I just cut rectangles. (Though I did see some recently at a friends house and she had taken the time to make the rings and they were a easier for the babies to hold. Next time!)
I did not cut them into circles. I just cut rectangles. (Though I did see some recently at a friends house and she had taken the time to make the rings and they were a easier for the babies to hold. Next time!)
Saturday, June 13, 2009
Potstickers
Chinese dumplings/potstickers (aka gyoza in Japanese) Thank you Jen from use real butter for hosting the Daring Cooks June 2009 challenge.
I have wanted to learn how to make potstickers for such a LONG time. I was so excited by this challenge. Thank you, thank you, thank you!
I have to say, my finished product was not very pretty, but they tasted good, AND I had fun. It took a long time to get them all done.
I started by making the wrapper dough. AS it was resting I began to make the filling. I used a little bit of this and a little bit of that. Basically I just opened the fridge, freezer, and pantry and found what I could use up.
I used some ground pork, carrots, spinach, garlic, egg, soy sauce, sesame oil, cornstarch. Maybe some other things too. I did it in a frenzy, so I don't much remember what I was throwing in there. From the picture it looks like I also added some teriyaki sauce, chardonnay salt, cilantro bullion and onion bullion.

 I then began to roll out the wrappers. Then used a Tablespoon to scoop the filling into the wrapper.
 I began to fold them. It took a bit to get the hang of it. It took awhile to get the wrappers thin enough. I played with a couple of different ways to fold them up. Some worked better than others.

I froze these dumplings to use at a later time. Here they are after freezing individually, but before I bagged them.
A few days later I did finally cook some up for dinner. I made a simple dipping sauce with soy sauce, sesame oil.

I thought they turned out a bit salty, Chris thought the dipping sauce was salty. Regardless, they were pretty good.
After I had used-up all the pork filling I still had a good amount of wrapper dough left. So I decided to try something fun. I thought about a dessert filling, but honestly at that moment I was hungry and wanted something savory.
I took some cottage cheese and drained it a bit. Added cilantro and a little cornmeal. (the cornmeal was to thicken it up a bit.)
I made the dumplings, pan fried them and served them with some avocado and lemon. They were SOOOOOOOO good. I think the best thing I have eaten in a long time. Granted, I may have been really hungry, but I think they were just really good.
The Recipe as I received it.
It's a basic concept: a filling inside a dough wrapper, sealed, and cooked. This delicious theme runs through many cultures and is among the more popular bites at Chinese restaurants - especially dim sum. The recipe I provide is based on my family recipe. There is a lot of wiggle room and I encourage you to explore. If you've made them before - great! Now try something different!
The process goes a little like this:

You can (and should) reference instructional photos and discussion on my blog post here.
Wrappers: Well yes, you could purchase pre-made dumpling wrappers at the store (NO WONTON WRAPPERS - they have egg), but they are inferior compared to homemade. The whole point of this challenge is to make the dumpling wrappers by hand. So here is the one requirement: the dumpling wrappers must be made by hand. It isn't all that hard, it just takes a little time and practice. People usually get the hang of it after making about a dozen. **NOTE: I have a special recipe for gluten-free dumpling wrappers at the bottom of the post. They are another type of traditional dumpling and they are pretty awesome (although more finicky). Really delicious too, so you may want to have a looksee even if you aren't gluten-free. [EDIT 5/18/09:] I see that some have chosen to make the wrappers by hand. I don't recommend this method because the wrappers will be too thick and probably yield far fewer dumplings for the dough recipe. The point of rolling the dough is for uniformity of wrapper and to achieve a thickness that is otherwise difficult to attain by hand. Also, rolling is much faster than hand shaping. We're aiming for a delicate skin that does not dominate the dumpling.
Fillings: the beauty of the Chinese dumpling/potsticker is that the filling is very versatile. That's why there are so many different kinds of dumplings when you go to dim sum. The two most common are pork and shrimp. You can make them with other ground meats (beef, chicken...) or vegetarian (tofu, mushrooms, bamboo shoots, water chestnuts, glass noodles, Chinese chives - oh yum!). The important thing to keep in mind is that the filling needs to "stick" to itself or else you will make your life incredibly miserable wrapping up filling that keeps falling apart. I think if I were to make vegetarian dumplings, I would sauté the cabbage and mash up the tofu for a better cohesiveness. It's up to you how you want to fill your dumplings and I say - run with it! Just keep it cohesive and no big chunks of hard ingredients (they poke through the wrapper dough = disaster). I realize it may be tempting to dump all of the vegetables into a food processor and give it a whir, but I caution against it. You don't want a slurry, you want a mince. Practice your knife skills and be careful.
Special Equipment: A rolling pin - preferably not tapered. (see blog pictures for the type I use).
Time: Prep for the filling takes me 30 minutes - longer if peeling and de-veining shrimp. It will depend on your proficiency with a good sharp knife. Rolling and wrapping several dozen dumplings takes me 1 hour by myself. My parents can crank through it in 30 minutes when one person is rolling wrappers and the other is wrapping dumplings. Might be fun to get a second person to help! Cooking: I have to cook mine in batches. When steaming, I can cook a dozen at a time in about 10 minutes. Potstickers: 15 minutes per 2 dozen determined by the size of your pan. Boiling - 6 minutes per dozen or so depending on size of pot. My own personal preference is for potstickers - mmmmm! But they are ALL good. Here is the recipe:
Chinese Dumplings/Potstickers
pork filling:
1 lb (450g) ground pork
4 large napa cabbage leaves, minced
3 stalks green onions, minced
7 shitake mushrooms, minced (if dried - rehydrated and rinsed carefully)
1/2 cup (75g) bamboo shoots, minced
1/4 (55g) cup ginger root, minced
3 tbsp (40g) soy sauce
2 tbsp (28g) sesame oil
2 tbsp (16g) corn starch
OR
shrimp filling:
1/2 lb (225g) raw shrimp, peeled, deveined, and coarsely chopped
1/2 lb (225g) ground pork
3 stalks green onions, minced
1/4 cup (55g) ginger root, minced
1 cup (142g) water chestnuts, minced
1 tsp (5g) salt
3 tbsp (40g) sesame oil
2 tbsp (16g) corn starch
dough: (double this for the amount of filling, but easier to make it in 2 batches - or just halve the filling recipe)
2 cups (250g) all-purpose flour
1/2 cup (113g) warm water
flour for worksurface
dipping sauce:
2 parts soy sauce
1 part vinegar (red wine or black)
a few drops of sesame oil
chili garlic paste (optional)
minced ginger (optional)
minced garlic (optional)
minced green onion (optional)
sugar (optional)
Combine all filling ingredients in a large mixing bowl and mix thoroughly (I mix by clean hand). Cover and refrigerate until ready to use (up to a day, but preferably within an hour or two).
Make the dough, Method 1: Place the flour in the work bowl of a food processor with the dough blade. Run the processor and pour the warm water in until incorporated. Pour the contents into a sturdy bowl or onto a work surface and knead until uniform and smooth. The dough should be firm and silky to the touch and not sticky.[Note: it’s better to have a moist dough and have to incorporate more flour than to have a dry and pilling dough and have to incorporate more water).
Make the dough, Method 2 (my mom’s instructions): In a large bowl mix flour with 1/4 cup of water and stir until water is absorbed. Continue adding water one teaspoon at a time and mixing thoroughly until dough pulls away from sides of bowl. We want a firm dough that is barely sticky to the touch.
[EDIT: 5/26/09] There have been two complaints posted about a dry dough and I realize that this rests in the problem of measuring flour which has a different density and hence weight for 2 cups depending on how you scoop it. That is why I also list the weight: 250g. Flour tends to settle over time, so when I scoop it out, I shake several cups' worth back into the container before taking a final scoop of soft, fluffy, flour and I get 250g for 2 cups. When you knead the dough, if it feels hard and dry, then you can add more water. [Warning: it will NOT be a soft bread dough, so don't expect it to be, but it shouldn't be a brick either.] It is perfectly fine to use more than the 1/2 cup listed in the recipe as everyone's climate and flours vary. Use your judgment - this is what being a Daring Cook is about. We are trying to cultivate a sense of intuition so that recipes are general guidelines from which you can expand your own style.
Both dough methods: Knead the dough about twenty strokes then cover with a damp towel for 15 minutes. Take the dough and form a flattened dome. Cut into strips about 1 1/2 to 2 inches wide. Shape the strips into rounded long cylinders. On a floured surface, cut the strips into 3/4 inch pieces. Press palm down on each piece to form a flat circle (you can shape the corners in with your fingers). With a rolling pin, roll out a circular wrapper from each flat disc. Take care not to roll out too thin or the dumplings will break during cooking - about 1/16th inch. Leave the centers slightly thicker than the edges. Place a tablespoon of filling in the center of each wrapper and fold the dough in half, pleating the edges along one side (see images in post for how to fold pleats). Keep all unused dough under damp cloth.
To boil: Bring a large pot of water to a boil and add dumplings to pot. Boil the dumplings until they float.
To steam: Place dumplings on a single layer of napa cabbage leaves or on a well-greased surface in a steamer basket with lid. Steam covered for about 6 minutes.
placing the dumplings in a steamer over napa cabbage leaves

steamed and ready to eat

To pan fry (potstickers): Place dumplings in a frying pan with 2-3 tbsp of vegetable oil. Heat on high and fry for a few minutes until bottoms are golden. Add 1/2 cup water and cover. Cook until the water has boiled away and then uncover and reduce heat to medium or medium low. Let the dumplings cook for another 2 minutes then remove from heat and serve.
potstickers, bottoms up to show off the crunchies

To freeze: Assemble dumplings on a baking sheet so they are not touching. It helps to rub the base of the dumpling in a little flour before setting on the baking sheet for ease of release. Freeze for 20-30 minutes until dumplings are no longer soft. Place in ziploc bag and freeze for up to a couple of months. Prepare per the above instructions, but allow extra time to ensure the filling is thoroughly cooked.
To serve: Serve dumplings or potstickers hot with your choice of dipping sauce combinations.
I have wanted to learn how to make potstickers for such a LONG time. I was so excited by this challenge. Thank you, thank you, thank you!
I have to say, my finished product was not very pretty, but they tasted good, AND I had fun. It took a long time to get them all done.
I started by making the wrapper dough. AS it was resting I began to make the filling. I used a little bit of this and a little bit of that. Basically I just opened the fridge, freezer, and pantry and found what I could use up.
I used some ground pork, carrots, spinach, garlic, egg, soy sauce, sesame oil, cornstarch. Maybe some other things too. I did it in a frenzy, so I don't much remember what I was throwing in there. From the picture it looks like I also added some teriyaki sauce, chardonnay salt, cilantro bullion and onion bullion.


 I then began to roll out the wrappers. Then used a Tablespoon to scoop the filling into the wrapper.
 I began to fold them. It took a bit to get the hang of it. It took awhile to get the wrappers thin enough. I played with a couple of different ways to fold them up. Some worked better than others.

I froze these dumplings to use at a later time. Here they are after freezing individually, but before I bagged them.

A few days later I did finally cook some up for dinner. I made a simple dipping sauce with soy sauce, sesame oil.


I thought they turned out a bit salty, Chris thought the dipping sauce was salty. Regardless, they were pretty good.
After I had used-up all the pork filling I still had a good amount of wrapper dough left. So I decided to try something fun. I thought about a dessert filling, but honestly at that moment I was hungry and wanted something savory.
I took some cottage cheese and drained it a bit. Added cilantro and a little cornmeal. (the cornmeal was to thicken it up a bit.)

I made the dumplings, pan fried them and served them with some avocado and lemon. They were SOOOOOOOO good. I think the best thing I have eaten in a long time. Granted, I may have been really hungry, but I think they were just really good.

The Recipe as I received it.
It's a basic concept: a filling inside a dough wrapper, sealed, and cooked. This delicious theme runs through many cultures and is among the more popular bites at Chinese restaurants - especially dim sum. The recipe I provide is based on my family recipe. There is a lot of wiggle room and I encourage you to explore. If you've made them before - great! Now try something different!
The process goes a little like this:
You can (and should) reference instructional photos and discussion on my blog post here.
Wrappers: Well yes, you could purchase pre-made dumpling wrappers at the store (NO WONTON WRAPPERS - they have egg), but they are inferior compared to homemade. The whole point of this challenge is to make the dumpling wrappers by hand. So here is the one requirement: the dumpling wrappers must be made by hand. It isn't all that hard, it just takes a little time and practice. People usually get the hang of it after making about a dozen. **NOTE: I have a special recipe for gluten-free dumpling wrappers at the bottom of the post. They are another type of traditional dumpling and they are pretty awesome (although more finicky). Really delicious too, so you may want to have a looksee even if you aren't gluten-free. [EDIT 5/18/09:] I see that some have chosen to make the wrappers by hand. I don't recommend this method because the wrappers will be too thick and probably yield far fewer dumplings for the dough recipe. The point of rolling the dough is for uniformity of wrapper and to achieve a thickness that is otherwise difficult to attain by hand. Also, rolling is much faster than hand shaping. We're aiming for a delicate skin that does not dominate the dumpling.
Fillings: the beauty of the Chinese dumpling/potsticker is that the filling is very versatile. That's why there are so many different kinds of dumplings when you go to dim sum. The two most common are pork and shrimp. You can make them with other ground meats (beef, chicken...) or vegetarian (tofu, mushrooms, bamboo shoots, water chestnuts, glass noodles, Chinese chives - oh yum!). The important thing to keep in mind is that the filling needs to "stick" to itself or else you will make your life incredibly miserable wrapping up filling that keeps falling apart. I think if I were to make vegetarian dumplings, I would sauté the cabbage and mash up the tofu for a better cohesiveness. It's up to you how you want to fill your dumplings and I say - run with it! Just keep it cohesive and no big chunks of hard ingredients (they poke through the wrapper dough = disaster). I realize it may be tempting to dump all of the vegetables into a food processor and give it a whir, but I caution against it. You don't want a slurry, you want a mince. Practice your knife skills and be careful.
Special Equipment: A rolling pin - preferably not tapered. (see blog pictures for the type I use).
Time: Prep for the filling takes me 30 minutes - longer if peeling and de-veining shrimp. It will depend on your proficiency with a good sharp knife. Rolling and wrapping several dozen dumplings takes me 1 hour by myself. My parents can crank through it in 30 minutes when one person is rolling wrappers and the other is wrapping dumplings. Might be fun to get a second person to help! Cooking: I have to cook mine in batches. When steaming, I can cook a dozen at a time in about 10 minutes. Potstickers: 15 minutes per 2 dozen determined by the size of your pan. Boiling - 6 minutes per dozen or so depending on size of pot. My own personal preference is for potstickers - mmmmm! But they are ALL good. Here is the recipe:
Chinese Dumplings/Potstickers
pork filling:
1 lb (450g) ground pork
4 large napa cabbage leaves, minced
3 stalks green onions, minced
7 shitake mushrooms, minced (if dried - rehydrated and rinsed carefully)
1/2 cup (75g) bamboo shoots, minced
1/4 (55g) cup ginger root, minced
3 tbsp (40g) soy sauce
2 tbsp (28g) sesame oil
2 tbsp (16g) corn starch
OR
shrimp filling:
1/2 lb (225g) raw shrimp, peeled, deveined, and coarsely chopped
1/2 lb (225g) ground pork
3 stalks green onions, minced
1/4 cup (55g) ginger root, minced
1 cup (142g) water chestnuts, minced
1 tsp (5g) salt
3 tbsp (40g) sesame oil
2 tbsp (16g) corn starch
dough: (double this for the amount of filling, but easier to make it in 2 batches - or just halve the filling recipe)
2 cups (250g) all-purpose flour
1/2 cup (113g) warm water
flour for worksurface
dipping sauce:
2 parts soy sauce
1 part vinegar (red wine or black)
a few drops of sesame oil
chili garlic paste (optional)
minced ginger (optional)
minced garlic (optional)
minced green onion (optional)
sugar (optional)
Combine all filling ingredients in a large mixing bowl and mix thoroughly (I mix by clean hand). Cover and refrigerate until ready to use (up to a day, but preferably within an hour or two).
Make the dough, Method 1: Place the flour in the work bowl of a food processor with the dough blade. Run the processor and pour the warm water in until incorporated. Pour the contents into a sturdy bowl or onto a work surface and knead until uniform and smooth. The dough should be firm and silky to the touch and not sticky.[Note: it’s better to have a moist dough and have to incorporate more flour than to have a dry and pilling dough and have to incorporate more water).
Make the dough, Method 2 (my mom’s instructions): In a large bowl mix flour with 1/4 cup of water and stir until water is absorbed. Continue adding water one teaspoon at a time and mixing thoroughly until dough pulls away from sides of bowl. We want a firm dough that is barely sticky to the touch.
[EDIT: 5/26/09] There have been two complaints posted about a dry dough and I realize that this rests in the problem of measuring flour which has a different density and hence weight for 2 cups depending on how you scoop it. That is why I also list the weight: 250g. Flour tends to settle over time, so when I scoop it out, I shake several cups' worth back into the container before taking a final scoop of soft, fluffy, flour and I get 250g for 2 cups. When you knead the dough, if it feels hard and dry, then you can add more water. [Warning: it will NOT be a soft bread dough, so don't expect it to be, but it shouldn't be a brick either.] It is perfectly fine to use more than the 1/2 cup listed in the recipe as everyone's climate and flours vary. Use your judgment - this is what being a Daring Cook is about. We are trying to cultivate a sense of intuition so that recipes are general guidelines from which you can expand your own style.
Both dough methods: Knead the dough about twenty strokes then cover with a damp towel for 15 minutes. Take the dough and form a flattened dome. Cut into strips about 1 1/2 to 2 inches wide. Shape the strips into rounded long cylinders. On a floured surface, cut the strips into 3/4 inch pieces. Press palm down on each piece to form a flat circle (you can shape the corners in with your fingers). With a rolling pin, roll out a circular wrapper from each flat disc. Take care not to roll out too thin or the dumplings will break during cooking - about 1/16th inch. Leave the centers slightly thicker than the edges. Place a tablespoon of filling in the center of each wrapper and fold the dough in half, pleating the edges along one side (see images in post for how to fold pleats). Keep all unused dough under damp cloth.
To boil: Bring a large pot of water to a boil and add dumplings to pot. Boil the dumplings until they float.
To steam: Place dumplings on a single layer of napa cabbage leaves or on a well-greased surface in a steamer basket with lid. Steam covered for about 6 minutes.
placing the dumplings in a steamer over napa cabbage leaves
steamed and ready to eat
To pan fry (potstickers): Place dumplings in a frying pan with 2-3 tbsp of vegetable oil. Heat on high and fry for a few minutes until bottoms are golden. Add 1/2 cup water and cover. Cook until the water has boiled away and then uncover and reduce heat to medium or medium low. Let the dumplings cook for another 2 minutes then remove from heat and serve.
potstickers, bottoms up to show off the crunchies
To freeze: Assemble dumplings on a baking sheet so they are not touching. It helps to rub the base of the dumpling in a little flour before setting on the baking sheet for ease of release. Freeze for 20-30 minutes until dumplings are no longer soft. Place in ziploc bag and freeze for up to a couple of months. Prepare per the above instructions, but allow extra time to ensure the filling is thoroughly cooked.
To serve: Serve dumplings or potstickers hot with your choice of dipping sauce combinations.
Subscribe to:
Posts (Atom)